Read-In/Read-Out Configuration
VOLO controllers are designed to manage 2 doors in a Read-In, Exit Button Out configuration. However, it is possible to wire the controller in such a way that it can be used as a 1-door controller in a Read-In, Read-Out configuration (with some caveats).
caution
There is currently no configuration option available to change the way that the VOLO controller activates the relays. They only work in the default configuration:
- When a valid credential is presented to Reader 1, Relay 1 will be triggered.
- When a valid credential is presented to Reader 2, Relay 2 will be triggered.
With this in mind, the only way to control a single lock using either Reader 1 or Reader 2 is to make use of BOTH Relays.
This can result in unexpected sequences of events being displayed in the system.
Wiring The Controller
When wiring up a VOLO controller in a Read-In/Read-Out configuration, you must follow the appropriate instructions for the type of lock you are using (see either "Fail Safe Locks" or "Fail Secure Locks" below).
Door Contacts
The simplest option is to use only one of the door contact inputs and wire this up as normal. Some configuration changes will be required in the VOLO software to make sure the events come through as expected (see "Software Configuration" below).
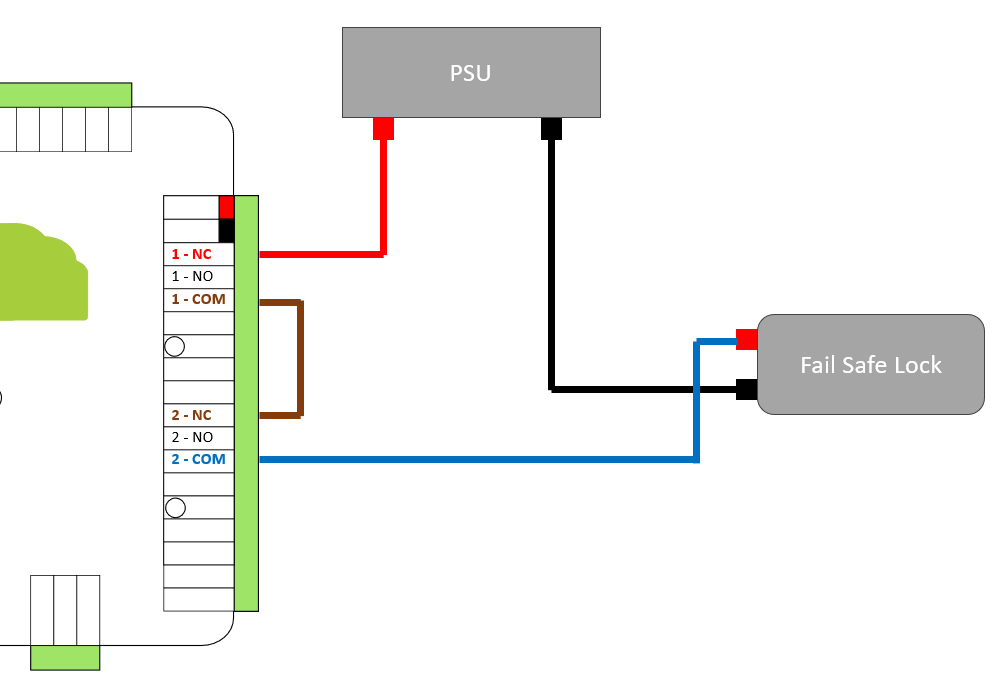
Fail Safe Locks
When working with Fail Safe locks, like mag-locks, we need to allow either relay to interrupt the power and so the relays should be wired in series with each other between the power source and the lock, as shown in the diagram below.
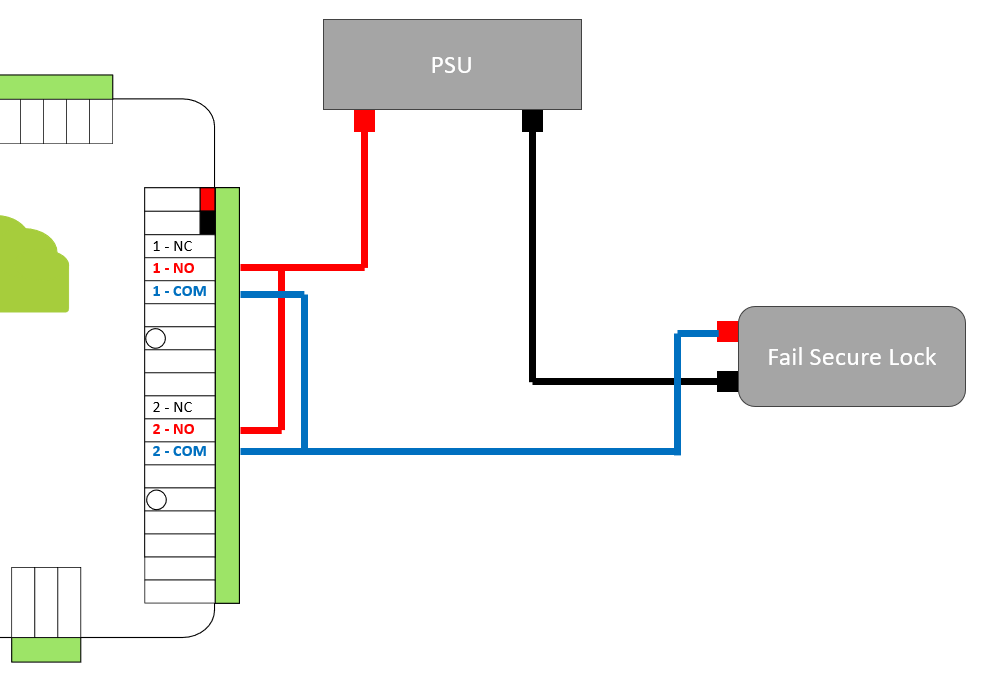
Fail Secure Locks
When working with Fail Secure locks, we need to allow either relay to provide power to the lock, so the relays should be wired in parallel with each other between the power source and the lock, as shown in the diagram below.
Exit Buttons
If you have a need for Exit Buttons or similar in addition to the Read-In/Read-Out configuration, you can use either of the standard Exit Button inputs, or both of them as normal.
Software Configuration
As mentioned above, there is not currently a 'Read-in/Read-out' mode in the system, but we can make some changes to the configuration and settings to make the system behave as well as possible.
Managing Doors
The VOLO system expects each controller to manage 2 doors, so you will need to create both of them and manage them separately.
Naming Doors
When naming the doors, we recommend using something like:
- Office - IN
- Office - OUT
Door Settings
In general, we would recommend that one of the 2 doors (or readers) being managed by the VOLO controller should act as the 'primary' door. For example, you do not need a door held open time configured for both doors when they are wired to the same door contact.
With this in mind, we recommend either disabling some of the settings on one of the doors or assigning values that essentially mean that they will never come into play.
tip
If you have your default settings correctly configured at the Site or Customer level then this process will be easier!
Door Held Open Time
Set the value that you would like to use on door 1 (or allow door 1 to inherit the default setting from the Site or Customer.) Set the same setting on door 2 to be the maximum time allowed.
Door Open Time
In this case, the setting needs to be valid on both doors to ensure that you get the same behaviour when going IN or OUT. If this is configured at Site or Customer level then you just need both doors to inherit the default setting.
Unlock During Timezone
If this feature is required, then we would recommend assigning the same setting to both doors. This is only to ensure that each reader shows the correct 'unlocked' status (LEDs displaying access granted).
Access Levels
The VOLO system considers the Read-In 'door' and the Read-Out 'door' as separate entities and so you will need to include both when including them in access levels.
Event Settings
If you have wired in only one door contact as recommended, then we will also need to change the name for the 'Door Forced' event.
For example - if a credential is presented to Reader 2, access is granted and the door is opened, this will be interpreted as a 'Door Forced' for 'Door 1' because there was no valid access granted linked with door 1.
So, if you have wired in Door Contact 1, we recommend changing the event settings for Door 1 and changing the name of 'Door Forced' to 'Door Opened - Out'.
You could optionally change the name of 'Door Opened' to 'Door Opened - In' for consistency.
caution
This configuration will mean that the 'Door Forced' event is no longer available on this door.